Cabinet painting is an intricate art that requires special knowledge to achieve a long-lasting finish. Learn the tricks professional cabinet painters use to prevent paint chipping and keep your cabinets looking like new. Investing in a high-quality paint that resists chips and wear is important for maintaining the look of your cabinets. To avoid the need for frequent touch-ups, regular maintenance is necessary.
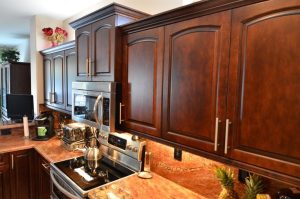
Cabinet Painters can transform a room, giving it a new and fresh appearance. However, if it isn’t done properly, peeling paint can ruin the overall look and shorten its lifespan. The humid climate of Alexandria, improper application, or using the wrong type of paint can all contribute to this problem. Here are some best practices for avoiding and fixing peeling cabinet paint to ensure your beautiful new finish lasts as long as possible.
Start by cleaning the surface of the cabinet where the paint is chipping. You’ll want to remove any dust or debris and wipe the surface down with a degreaser to remove grease. Be sure to allow the area to dry completely before proceeding.
Lightly sand the areas where the paint is chipping. Ideally, you should use 320 grit sandpaper to avoid removing too much of the existing finish. Using a very light touch is key to successfully touching up chipped areas and making them blend in seamlessly with the rest of the paint.
Once the sanded area is clean, you can apply your touch up paint. It’s important that you choose a paint with a similar sheen to your cabinets to make the touch-up as seamless as possible. If you aren’t sure what sheen you need, ask the paint counter at your local hardware store for help. They can run a sample of your cabinet color through their cool Matchrite iVue machine to match the exact shade and sheen that you need.
Once you have your custom paint ready, apply a few thin coats of it to the affected areas and allow each one to dry fully before applying another. This is the trick to creating a flawless finish that won’t chip or peel in the future.
Clean the Surface
A fresh coat of cabinet paint can instantly update the appearance of a room. However, without proper care and maintenance, your new cabinets can deteriorate within months or even weeks of installation. Paint chipping is one of the most common problems that affects painted surfaces and it’s often caused by a combination of factors, including poor application, improper cleaning, or the Alexandria’s humid climate. Fortunately, there are several best practices that professional cabinet painters use to prevent paint chipping and ensure that your kitchen or bathroom cabinets remain gorgeous for years to come.
First, you need to clean the surface of your cabinet paint. The best way to do this is to use a soft cloth dampened with a degreaser or dishwashing liquid. After you’ve cleaned the surface, dry it with a clean cloth or towel. Avoid using harsh scouring powders or abrasive cleaning products; these can scratch or damage the wood.
Once the surface is clean, it’s time to sand the chipped areas. You can use a handheld sander or a power sander to accomplish this task, depending on the size of the chips and the condition of the surface. When you sand, you’ll want to focus on the damaged areas. Make sure that you use a fine-grit sandpaper (320 works well) to minimize the risk of damaging the underlying wood.
If the cabinets have been previously painted and the paint is already chipping, you can apply a bonding primer to improve adhesion before repainting. An oil-based primer is ideal, but if you choose to use an acrylic primer, choose one that is designed for cabinet and trim enamel. For example, a favorite among professional painters is Fresh Start High-Hiding All-Purpose Primer; it provides excellent hide and suppresses stains. After applying the primer, let it dry for an hour or so.
Sand the Surface
When painting over a previous coat of paint it is almost always necessary to sand the surface. This will create a smoother surface for the new paint to adhere to, and it will help the chipped areas blend in with the rest of the cabinet. You can use a hand held sanding sponge or a block sander for this task. It is important to choose a sandpaper grit that matches your existing cabinet finish. If you aren’t sure what grit your cabinet is painted with, get a sample at the paint counter and apply it to an out of the way area on your cabinet to see how it looks.
After sanding, wipe the cabinet surfaces down with a degreaser to ensure they are completely clean. You should also clean the cabinet hardware and hinges. Using a microfiber rag and warm water should be enough to remove any grease build up, but you may need to use a stronger product like TSP Heavy Duty cleaner. Make sure you follow the TSP’s instructions on how to use it and always work in a well ventilated area.
If you’re not going to re-stain the cabinets you can skip this step, but if they are stained it’s essential. If you don’t sand the cabinets before staining they will be abrasive and won’t take stains well, so you will have to repaint them. You should also sand the cabinet hinges and hardware to prepare them for reinstallation. Once the sanding and cleaning are done it’s time to start painting. The best cabinet paint is a high-quality oil-based primer, but if you are only doing touch-ups you can usually get away with just using a regular latex wall paint.
Apply Multiple Thin Coats of Paint
Cabinet painting is a great way to refresh the look of your kitchen. But when the new paint starts to chip, you need to act quickly before the problem worsens. Avoiding chipping and peeling after refinishing is all about proper preparation, using the right products, and applying thin coats. Here are some tips to keep in mind to prevent your cabinets from becoming a paint chip nightmare:
Whether you’re doing touch-ups or repainting your entire kitchen, multiple thin coats are always better than one thick coat. Thin coats allow the finish to dry more evenly, minimizing brush strokes and imperfections. They also help the finish hold up against daily wear and tear.
The type of paint you use is also important. Choose a durable, high-quality paint made specifically for cabinets or other high-traffic areas. Low-quality products may not adhere to the surface as well, leading to a less durable finish that chips and peels more easily.
Improper Surface Preparation
The surface of your cabinets must be clean and sanded before applying any paint or stain. If grease, dirt, or old varnish is still on the surface, it can cause problems with adhesion and lead to chipping and peeling over time. Skipping the sanding step or using a low-quality sandpaper can also cause problems.
Choosing the Right Primer
Apply a Sealant
A fresh coat of paint can transform your kitchen cabinets, giving the space a beautiful new look. However, the elation can turn to disappointment when the paint chips and starts to peel in just a few months. This is a common problem among homeowners, often due to moisture in the Alexandria area, poor prep work, or cheap paint. Luckily, it’s also one of the easiest fixes!
Start by carefully cleaning the cabinet surfaces to remove any grease or dust. A degreaser or a damp cloth will do the trick. Once the surface is clean, lightly sand the chipped areas to smooth them out. Use a piece of 320-grit sandpaper for this task, which will give the surface an even finish without taking off too much extra paint.
Once the sanded areas are completely dry, apply multiple thin coats of paint to the affected surfaces. Allow each coat to dry fully between applications. It’s important to apply many light layers in order to ensure that the new paint blends well with the existing layer and doesn’t look too obvious.
Finally, if you’re using a custom-tinted paint and don’t have a sample in the same sheen, do a test patch on an out-of-the-way spot of your cabinets to make sure that the touch ups will match. This step isn’t usually necessary when working with touch ups, but it’s a good idea in general to avoid sheen differences if possible.
With the right preparation and application techniques, your cabinet painting job can last a long time! Investing in high-quality paint and taking care to prepare the surface properly will help keep your cabinets looking great for longer.