Metal Craft

The Custom Stair and Railing Design Process Explained

Custom Stairs and Railings

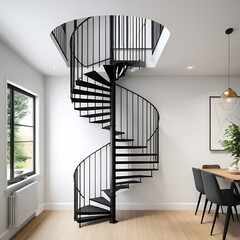
Custom Stairs and Railings are a key element that elevates the aesthetic of your home. It’s important to consider how the new railing will blend with existing features like window trim and flooring.

The process of designing stair railings involves meticulous preparation. This includes accurate measurements, choosing the proper mounting style, and ensuring material compatibility with environmental conditions for outdoor installations.

Designing Your Railing

Designing your stair railing is a great opportunity to enhance the aesthetic of your home. The right combination of materials and design elements can speak to your personal taste and complement existing features like window trim and flooring. To get started, consider creating a mood board to visualize how different colors, materials, and styles will work together. This allows you to experiment with combinations before making any permanent decisions, ensuring that your new handrail will be perfectly at home in your home.

During this stage, you will also need to decide whether your staircase will be wall-mounted or supported by standing posts. This will help determine how the railing is installed, as well as what material it will be made of. Wood is a classic choice that offers warmth and natural elegance, while metal materials like wrought iron or stainless steel offer a sleek, contemporary look. If you are looking to create a more modern design, glass is another option that offers transparency and lightness.

Stair fabrication is an intricate process that requires careful attention to detail. A quality fabrication team will ensure that your stair railing meets building codes and is safe for all users, from children to the elderly. They will also take into account the shape of your staircase, determining the proper height and spacing of balusters and handrails. This ensures that your stair railing is structurally sound and aesthetically pleasing.

Once the design is finalized, skilled craftsmen will begin to build your custom staircase using traditional craftsmanship and premium materials. They will use a range of joinery techniques, from mortise and tenon joints to dowels and dovetails, to provide strength and durability. They will also hand-finish the details, including carved balusters and decorative newel posts, to add character and charm.

Custom stairs can transform a room from ordinary into something special, adding luxury and sophistication. They are also a worthy investment, adding to your home’s value and increasing its resale appeal. The benefits of a bespoke staircase extend to the rest of your home, creating a consistent design language throughout the space.

Materials

The materials chosen for a staircase and railing make a significant difference in both aesthetics and structural integrity. The right combination of materials can create a truly unique look that integrates seamlessly with your home design and complements existing features like window trim and flooring. A good way to test your options is to use a mood board, which allows you to visualize how different colors, materials and styles will interact with the rest of your home.

A staircase is comprised of four basic components: treads, which are the horizontal surfaces that people step on; risers, which are vertical elements separating each step; and stringers, which provide stability and support. The stair fabrication process begins with careful planning, including accurate measurements and adhering to building codes regarding dimensions and load capacity. Once the planning phase is complete, the materials are cut and prepared for installation.

Stairs are typically made of wood, though a variety of other materials is available. Metals, for example, offer sleek, modern aesthetics, while glass and wrought iron can complement a range of design styles. Stairs can also be designed to incorporate natural elements, such as stone or marble, to add a sense of luxury and grandeur.

In addition to ensuring proper fit, each component is fastened securely using screws and other fasteners. Depending on the material, it may be necessary to apply sealers or protectors to help preserve and extend its lifespan. Decorative finishes like paint or stain complete the look and add a personal touch to each staircase.

Tools used during stair construction include measuring tape for precise cuts, a miter saw for angles, a drill with bits to accommodate screws and other fasteners, a screwdriver or wrenches, a sanding block or electric sander for smoothing surfaces, a level for ensuring a balanced look, and paintbrushes or stain applicators to finish the project. Choosing the right tools will ensure an accurate, high-quality final product.

Installation

Custom stairs and railings add beauty, function, and value to a home. Whether it’s a grand staircase in the foyer or a simple railing along a balcony, it’s important to create harmony with surrounding elements like window trim and flooring. This is not only to ensure safety, but also to preserve the integrity of the overall design scheme. High-quality materials and expert craftsmanship guarantee durability and stability.

During the design phase, it is important to take accurate measurements of the space and consider existing architectural elements that might influence or interfere with a new staircase design. Sketching a detailed plan or layout is helpful in understanding the final outcome and can help prevent costly mistakes during installation.

Once the design is completed, it’s time to begin the installation process. To start, it is important to carefully measure and mark the location of each newel post (the main support posts for the staircase). This is especially critical if the stair has turns or landings, as you’ll want to make sure your railings are properly aligned. Next, you’ll need to determine if the handrail will be top or side mounted, which can impact stability and aesthetics. Finally, you’ll need to decide on baluster spacing, which can range from tightly packed to open for a more contemporary look.

After the stair railing is installed, it’s time to finish up with decorative elements like posts caps and finials. These can be a fun way to bring in a pop of color or keep with a more classic, timeless look. Finally, you’ll need to stain or paint your railing based on your desired aesthetic. Staining preserves the natural wood grain while painting offers a variety of color options.

After your stair railing is finished, it’s important to perform routine maintenance to preserve the longevity of your investment. This includes regularly inspecting for signs of damage or wear, and addressing any issues promptly to avoid more costly repairs down the line. In addition, regular cleaning and application of a protective coating or sealant will keep your stair railings looking beautiful and functioning smoothly for years to come.

Maintenance

Stairs and railings serve both practical and decorative purposes, making them an important part of the overall design and flow of a home. Collaborating with a professional can ensure that the finished product aligns with your specific house plan and enhances your home’s aesthetic.

Proper maintenance is critical to the durability and longevity of stairs and railings. This process should include a thorough inspection and cleaning to prevent moisture buildup, rot, or rust. It also ensures that the structure meets all safety and stability requirements.

If your staircase is made from wood, it may need to be sanded and refinished periodically. Metal railings should be inspected regularly for rust spots and treated with a rust-inhibiting primer, followed by a rust-resistant coating.

Regular sweeping and mopping can reduce dirt buildup, which can lead to a slippery surface and potential accidents. It’s also a good idea to add anti-slip treads or strips to the steps to reduce the risk of falls, particularly in wet or icy conditions.

For outdoor stairs, it’s important to keep vegetation trimmed back to avoid moisture accumulation, which can cause wood to rot and metal to rust. Regular inspections should be conducted to identify any issues and address them as quickly as possible to avoid costly repairs or replacements.

A well-maintained staircase will contribute to the safety and comfort of your family, guests, and visitors, while adding to your home’s curb appeal. By taking the proper precautions and hiring a professional for any needed maintenance, you can enjoy your custom stairs and railings for years to come.

A properly installed staircase can make your Fairfax home more attractive and increase its value. If you are considering upgrading your staircase, consult with an experienced contractor to ensure that the final result meets all of your specifications and quality standards. They will help you choose the right materials, size, shape, and color to match the rest of your décor. They will also recommend the best care and maintenance practices that are specific to your railing material and style.

Cabinet Refinishing

How Much Does Cabinet Painting Cost?

Cabinet Painting Sacramento

Cabinet Painting Sacramento is a cost-effective way to refresh your kitchen and can yield an impressive return on investment through increased resale value. The scope of your project, paint selection, and prep work will all influence costs.

Proper preparation can extend the cabinet painting timeline and add to labor costs, while opting for premium paint can ensure a long-lasting finish.

Labor

When hiring a professional cabinet painter, the labor costs can vary widely. Some painters charge per cabinet face, while others may bill by the hour. The number of cabinets will also affect the cost, as larger kitchens require more time to paint. In addition, if the cabinets have to be stripped or prepped in some way, these additional steps will add to the overall project cost. The type of paint and method of painting also affect the cost. Premium paints often come with a higher price tag, but they offer better durability and coverage. They also typically last longer than budget paints.

The color of the cabinets also impacts the painting costs. Dark colors tend to require more coats, which will increase labor costs. In contrast, light or neutral shades will usually only need a few coats. Another factor is if the existing hardware will be reused or replaced. This can make a significant difference in the total cost of the job.

During the prep process, the cabinet painters will clean and sand the surfaces before painting. This is a crucial step that will determine how well the finished result looks. This process can take a long time, and it’s best left to a skilled professional. If you try to tackle the project yourself, you’ll likely have to spend twice as much time on the job in order to achieve a good result.

In some cases, it’s cheaper to repaint your cabinets rather than replace them. This can save you thousands compared to the cost of a full kitchen renovation. Depending on your tastes and budget, you can choose from a variety of finishes, including high-gloss and matte. However, keep in mind that glossy surfaces are more difficult to maintain and will show dust and fingerprints more prominently than a matte finish.

You can reduce the cost of your cabinet painting project by selecting affordable paint and supplies. Look for mid-range paints that balance quality and affordability. Also, try to limit the scope of your color change to avoid extra coats and extra labor. If you’re changing the entire color scheme, consider using a spray painter for a smooth and even finish. This technique uses high pressure to atomize the paint, which results in a much finer finish than brush or roller applications.

Materials

Cabinet painting is a cost-effective alternative to replacing your kitchen cabinets. It’s typically less expensive and can be completed within a shorter timeframe, minimizing disruption to your daily life. However, it’s important to consider all the factors that affect cost. For example, labor represents 60-85% of the total cost when hiring professional painters. Labor rates vary, with higher costs in cities or regions with a high cost of living. It’s also important to factor in any additional tasks or considerations that may increase the overall cost. For example, relocating appliances or masking adjacent surfaces will add to the total project costs. Replacing or upgrading hardware, as well as repairing cracks and dents, can also significantly impact the total costs.

The materials you choose will also impact the price of your cabinet painting project. Higher-quality paints often have a higher price tag but offer superior durability and coverage. In addition, higher-end materials like glazes and metallics can cost more than standard paint options. To cut costs, consider using an affordable mid-range paint that offers quality results without breaking the bank.

In terms of materials, you’ll want to make sure that your contractor uses low-VOC or zero-VOC paints. These paints are safer for the environment and your family, and they also emit fewer harmful chemicals during and after application. Additionally, you’ll want to avoid expensive specialty finishes or extras like decorative effects.

Labor is the biggest contributor to the cost of cabinet painting, as it accounts for 60-85% of the total bill. This includes the cost of hiring professional painters, as well as the materials and supplies needed for the job. Painting contractors usually charge by the hour, and their rate varies widely based on location, market, and experience. The size of the kitchen, number of cabinets, and the condition of the existing cabinets will also influence labor costs.

It’s worth noting that staining cabinets can be more cost-effective than painting, depending on your preferences. Staining allows the natural wood grain to show through and requires less effort than painting. However, it’s also important to remember that staining won’t provide as much color or style customization as painting.

Prep work

If you want a smooth, professional-looking finish, you need to do a thorough job of prep work before painting cabinets. This includes cleaning, sanding, and priming the surface before applying paint. These steps help ensure a long-lasting, attractive result that enhances your entire kitchen. Skipping these steps can lead to a messy, uneven paint job, so it’s worth investing the time and effort to do it properly.

The size of your kitchen is another significant factor in cabinet painting costs. Larger kitchens have more surfaces, so they require more labor and paint to cover. This also applies to kitchens with an open-concept design, which may feature cabinets in multiple areas.

Your choice of paint color can also impact cabinet painting costs. Premium paints tend to cost more, but they offer better durability and coverage. On the other hand, budget paints can provide satisfactory results for a fraction of the cost. If you’re trying to stay within a specific budget, it’s a good idea to limit your changes and opt for neutral shades that won’t require as many coats.

In addition to the type of paint, your project will also be influenced by the method of application. Professional spray painting is faster and more efficient than brush-and-roll techniques, but it requires specialized equipment that adds to the overall cost.

Some people choose to replace their cabinet hardware during a paint project, which can also increase costs. If you’re considering this option, it’s best to budget for it separately from the cabinet painting cost. This is because replacing cabinet hardware typically involves removing and installing new hinges and knobs, which can take several hours per cabinet door or drawer front. It’s also a good idea to reuse existing hardware, especially if it’s in excellent condition. This can save you the cost of buying and installing new hinges and knobs, as well as reduce labor costs.

Paint

Cabinets are the most visible element of any kitchen, and repainting or refinishing them can provide a significant visual impact without the expense of major renovations. However, the cost of painting cabinets varies by type and style, as well as color, labor rates, and paint quality. Depending on your goals, a professional can help you determine the best approach to suit your budget and taste.

Cabinet painting involves thorough surface prep, including sanding and priming. The type of finish you choose can also influence the price, as some types of paint require specialized techniques and may be more expensive than others. For example, a glossy finish requires more layers to achieve full coverage, which can drive up material costs. The number of cabinet doors and drawer fronts will also affect the total cost, as larger surfaces require more effort to cover.

The material of your cabinets can also influence the cost, as some types of wood are more resistant to paint adherence than others. Laminate and melamine cabinetry, for instance, need extra surface prep before paint application, increasing labor costs. Other details can also add to the cost, including raised panels or moldings. These features can be difficult to reach and can take more time to paint, which can increase labor rates.

The type of paint you use can also influence the cost, as premium paints may offer superior durability and coverage compared to budget options. While they tend to come with a higher price tag, they can save you money in the long run by resisting wear and tear more effectively and offering greater longevity.

Your paint color choice can also impact the overall cabinet painting cost, as lighter colors generally require fewer coats to hide existing cabinetry, while dark hues can require more to achieve the desired look. Custom or specialized paints can also be more expensive than basic whites or other neutral shades, driving up material and labor costs.

The type of method used to paint the cabinets will also influence the final cost, as spray painting is typically more efficient and produces a smoother finish than brush and roller methods. Using a sprayer also requires specialized equipment that can increase material and labor costs.